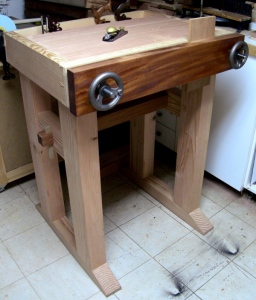
Joinery Bench Completed
 I finished up the Joinery bench just in time to make a few test cuts then pack it up in the truck for the trip to Woodworking in America. I’m still considering this design to be a pseudo prototype and need to spend more time working with it before casting a final verdict. Thanks to the thousand woodworkers who stopped by at WIA to take a look and share some observations. There were more than a few saw cuts made and dovetails chopped on the top to give me a good sample of how the bench will perform when it counts.
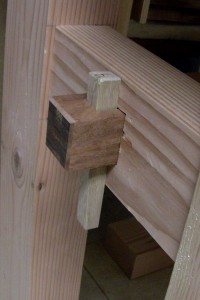
 In my last post I had just finished up the top and legs and did a dry fit to see how it looked. To completely finish it off, I added the stretchers, chopped a through mortise and fitted a trestle made from 12/4 Mahogany. The fit of the trestle through tenons into the stretcher mortises needs to be exact so that the whole bench doesn’t wobble. Once that was fit, I marked the locations for the peg mortises, chopped them, then tapered some small blocks of White Oak to make wedges. Once these wedges are pounded in place, the base tightens up completely to a solid platform. I’m still experiencing a bit of wiggle from side to side. Fortunately, it will be rare to exert force on the bench that way outside of sawing tenons. To fix this I will probably be adding a dovetailed stretcher at the back. I’m still ruminating on this.
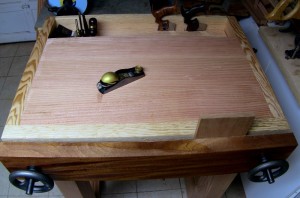
 The work surface is roomy and the tool tray has a few additions to hold my layout tools and my two most commonly used joinery saws. I will be adding some more things like a chisel rack in the future but I need to see what I really need first. I have left the work surface free of dog holes until I need them. Most often I work on bench hooks without securing the work piece so using holdfasts is not critical on this surface. I’m sure the time will come when a holdfast will save the day. When that happens, I’ll drill the hole. I have some ideas for a few simple accessories that will eliminate using bench hooks and instead turn the top into a bench hook of sorts with flip down saw fence and planing stops. Again, I want to spend some more time working on the top to see where it needs help first.
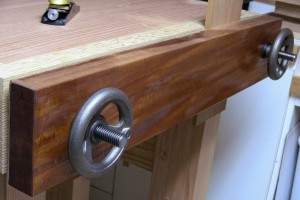
 One thing that needs no further consideration is the use of the Benchcrafted Moxon Vise on the front. This vise had me at hello, but when I integrated it into a fixed bench top set at the perfect height for my build, it is joinery nirvana. I made a few drawers for a commission I’m working on last night and my reasons for building this bench became very clear. No bending and the work was right up in my face so I could clearly see my layout lines. The Moxon is so smooth and strong that a quick spin of the wheels is all that is needed to lock the work piece in place. Switching pieces in and out is just as effortless. I can’t wait to do some wider case sides and really put the 26″ between screws to the test.
So I will call this build a success for now. I think any workbench is a work in progress that must be refined through work. The key is finding the right chassis or blank slate to start with to allow that refinement.
***WARNING ADVERTISEMENT****
I covered the basics of this bench but if you want to learn more about it’s construction, (all done by hand) or want to learn more about building and designing the right bench for your work, then you might consider joining The Hand Tool School. The first half of Semester 3 will be dedicated to this topic with quite a few videos not only on this bench, but many alternative techniques all done by hand.


