Perch Stool Part 1
Make this Stool Your Own
Here is part one of my Live build of the Perch Stool. If you are not familiar with this design it is essentially the bottom half of a Windsor chair and a great introduction to the wonderful world of Windsor. First, there are no bent parts. This gives us a lot of wiggle room with the stock needed. Certainly riven stock will make for a stronger stool but none of the turning are so thin that riving your parts is necessary. Second, since there is no steam bending kiln dried boards are just fine. Again, green wood would make this so much easier, but it isn’t necessary.
This means you can build this stool with lumber right from the yard. In this first part (and in the Campaign Stool I build a while ago) I show how to rive out parts from a regular KD board from the yard. I also talk about analyzing the grain so that perhaps you can skip the riving completely and know what you are getting into with your sawmill lumber.
Ignore My Sizes and Make This Fit You
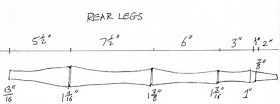
I cannot stress enough how important the process of selecting the height and the leg lengths are. Certainly if you go with the dimensions in Peter Galbert’s drawings then you will get a stool that will fit most folks and if you are building this for other people then that may be the best bet for you. But put some thought into it rather than just following my sizes.In this part I focus on the design aspects and then I move over to the lathe and turn 1 of the 3 legs using the pattern I created.
Parts for the Perch
- Seat: 8/4 x 15 x 13 (glued up blank is okay too)
- 3 legs, 2 x 2 x ?? You decide based on experimentation. My legs are 26 and 28″ long
- 2 stretchers, 2 x 2 x ~15 (final length to be determined after we leg up the stool)
Next Live Broadcast will be 12 PM on Saturday 10/28/17
I’ll be boring the holes for the legs and carving the seat.
Leg Patterns
Visit Peter Galbert’s blog for a full details and video on this stool. Plus you get to watch a master at work!


