Pressure of Unique Wood
Most of the wood I use is typical sawn boards in the FAS and better grade. Occasionally I’ll get a wider board, but it is still a sawn board with straight-ish edges. When I’m building I pay attention to grain and color like all of us to get a good match. It’s not uncommon to spend 30 minutes shuffling boards around for a table top looking for just the right pattern. I enjoy this process but in the back of my mind I know that there is always another board to call on should I not like the look of the panel. I know I’m pretty spoiled since I have easy access to millions of board feet of lumber at my day job but I’m no different from anyone else who has a lumber dealer nearby. Ok maybe I don’t pay as much, but still, another board is just a drive away.
So when I stacked my recently resawn Walnut slabs on my bench top to layout the 3 piece top for a drop leaf table I’m making, I was a bit alarmed at how difficult it was to decide on the layout. You see these boards are air dried, crotch figured Black Walnut. They were all resawn out of the same 24″ wide slab using my frame saw so I have more than a little time invested in them already. Suddenly I’m realizing that if I rip off an edge here or there and don’t like the resulting table top, I can’t just go get another board. Finding air dried Walnut, let along wide and figured stuff just isn’t easy. Even if it were, I don’t want to screw up this highly unusual board that I have already put so much work into.
Needless to say I spent 90 minutes flipping boards and moving them about on my bench coming up with layout scenarios. I even filmed a few examples if you care to watch:
Apr 2, 2013 | Drop Leaf Table layout option 1 by RenaissanceWW on Keek.com
Apr 2, 2013 | Drop Leaf top layout option 2 by RenaissanceWW on Keek.com
Apr 2, 2013 | Drop Leaf Table top layout option 3 by RenaissanceWW on Keek.com
I came up with at least 5 more options that all seemed feasible. I’m juggling variables like keeping or eliminating the live edge, where to place checks in the ends, and the typical grain pattern concerns. So many of these options look promising but they all require me to commit big time by making several saw cuts to split a board down the middle and cross cut to length. These are point of no return actions and frankly it is stressing me out.
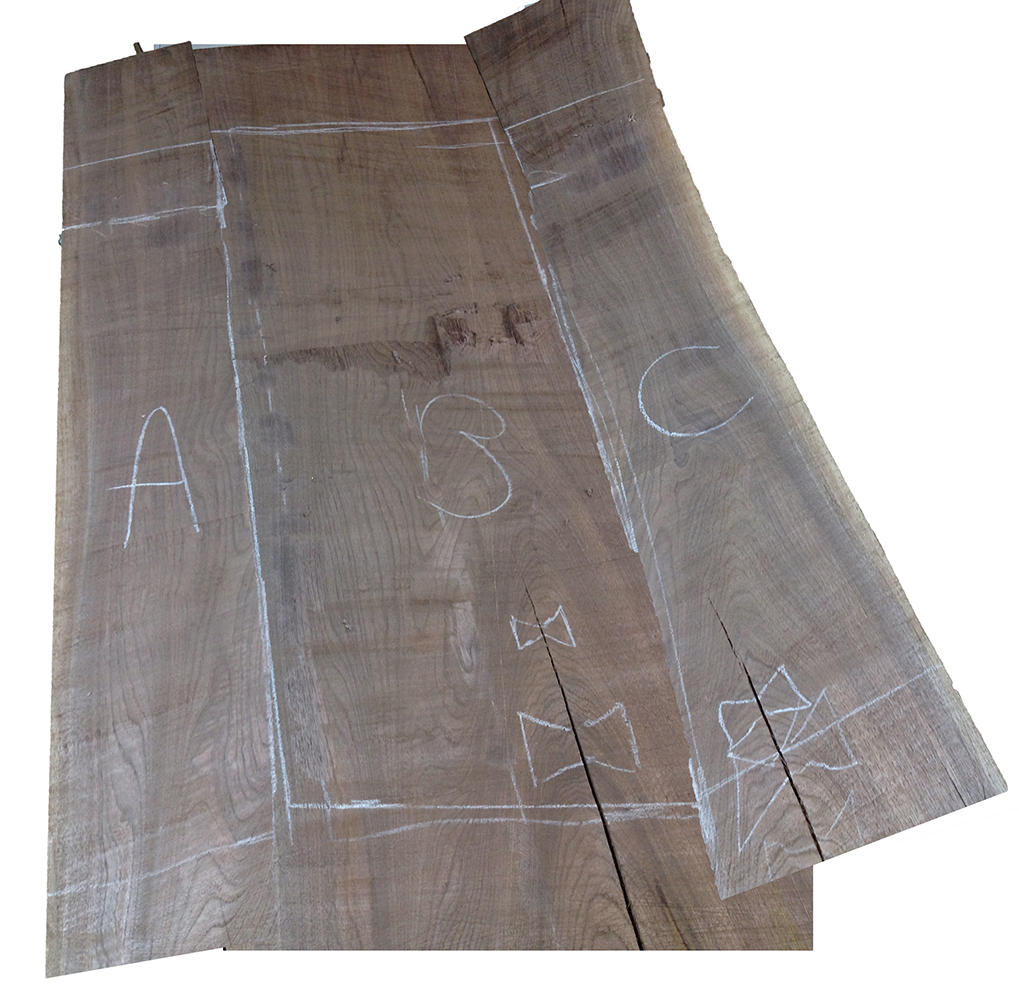
Enter modern technology! I took a few pictures of the boards then “cut” them up in Photoshop so I could move them around and arrange my perfect top. I’m no Photoshop expert and I wasn’t going for a beautiful finished image, (or one using the same perspective even!) but here is what I came up with:

I like this because I get to keep the live edges on the leaves for that organic feel and the rule jointed drop leaves don’t have to be a perfectly aligned and invisible glue line. This gives me some leeway on the match along the length of the board so I can keep the checks away from the edge where the joint goes. The only thing I’m still unsure of is whether to keep the two cracks adjacent or to flip one leaf end for end and break up the crotch figure and inlaid butterfly splines. A comment by Paul on Twitter has me rethinking this as clumping them together looks like a flock of butterflies.
Still some things to think about before I commit saw to the wood, but I feel better creating my virtual top. More importantly this unique board gave me a much needed reminder at how each board is unique and needs to be treated as such. Just because you can get another board doesn’t mean you shouldn’t try for the best use with each and every piece you work.
Your Turn
I love feedback and would welcome your thoughts on this top layout as well. I can’t guarantee I’ll listen as I am approaching the paralysis by analysis point, but let me know how you would do it or how you deal with layout situations like this.


